 So you’ve got a pressure gauge and, just like the trophy bass you caught this spring, you want to mount it so that everyone can see.
Although most applications allow a pressure gauge to be connected and left in place without this step, mounting a pressure gauge into an instrument panel can make it easier to read. And it can create a cleaner display by hiding the associated pipes and tubing.
But how do you do it?
We carry three of the most common types of pressure gauge mounting brackets available.
They are front flange, back flange, and U-clamp mounting brackets. The types of mounting bracket you use depends on the type of gauge you have and the look you are trying to accomplish.
The front flange and U-clamp are great for mounting gauges with a connection on the back. They can be used by themselves or in tandem.
A back flange bracket should be used with a lower mount gauge, which has the connection at the bottom, or a left/right side mount gauge.
Just a word of warning.
The cut steel mounting brackets can be sharp, so be careful when you are applying pressure or trying to fit a gauge!
Also, remember to remove the protective film from the front or back flange mounting brackets and any stickers that surround the gauge’s case. DuraChoice mounting brackets are machined to exacting parameters to fit snugly around their corresponding gauge. Removing the stickers and film makes installation easier.
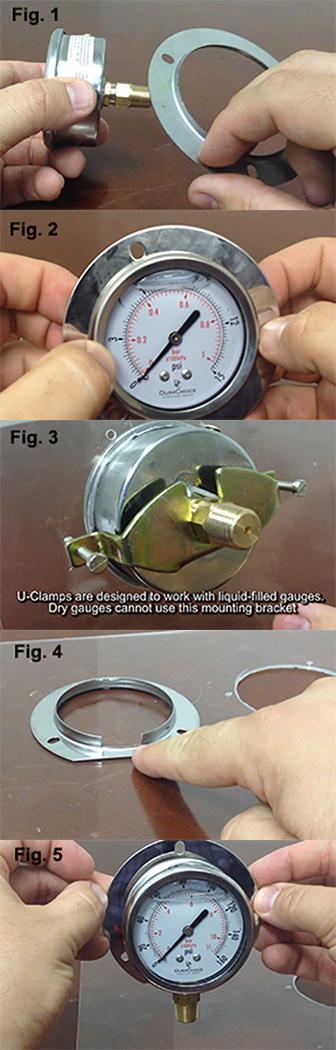
The front flange mounting bracket fits over the back of a gauge with a connection on its back (Fig. 1). Place the mounting bracket with the flared end pointed backward and the shiny side (which you just removed the protective film from) forward around the back of the gauge.
Take note of where the fastener (screw/bolt) holes are located around the ring of the bracket. If your panel has pre-drilled starter holes, it’s better to line the bracket’s holes up with them and orient your gauge’s face to the correct position before attaching the mounting bracket.
Although you can move the mounting bracket around the face once it has been attached, it is much easier to do so beforehand. When you have the face in the right place, apply pressure evenly (Fig. 2), working the ring slowly down the case. Rotating the gauge as you apply pressure may help slide the bracket on.
Once you have the bracket attached to the gauge, you can attach it to a pre-cut panel via screws or bolts if bolt holes have been pre-drilled.
Alternatively, you can install the bracket in the panel, then try to force the gauge into it. However the force needed to do this could damage the panel and is not advised.
While different in design and implementation, a U-clamp mounting bracket is also used with liquid-filled back connection gauges and requires a pre-cut panel for mounting. The U-clamp can be used in conjunction with a front flange mount, but both are not necessary, so long as the panel you are mounting the gauges into has correctly sized holes to prevent slippage. DuraChoice Dry Utility gauges use a different connection design and cannot be attached with the U-clamp.
To use a U-clamp bracket, feed the gauge through the panel as you would in the final step of the front flange installation. Once the gauge is through the panel, you can fit the “U” section of the U-clamp around a corresponding narrow point in the gauge’s connection (Fig. 3).
That will lock the clamp into place as you turn the accompanying bolts to create tension against the back of the panel. That tension is what holds the gauge in place, “clamping” the panel between the tension bolts and outer edge of the gauge case.
The back flange mounting bracket is the simplest bracket to install and the only mounting bracket that doesn’t require a pre-cut panel. Just pick the spot on the wall where you want to mount your bottom connection mount and screw the bracket into the wall with the flange forward (the shiny side will face front and the mount will be flat against the wall - See Fig. 4).
Be sure to keep the gap in the bracket flange in the appropriate location. For bottom mount gauges that means at the bottom. For left or right side mount gauges, it means the side with the connection. The gauge connection will fit into the gap when the gauge is pressed into it (Fig. 5).
Remember that the piping/tubing connecting to the gauge will be visible from the front with this mounting bracket. Although this may be less aesthetically pleasing, it does make the gauge connections more accessible for changes or maintenance.